Introduction to CoreData
Table of Contents
##Introduction
CoreData is a fundamental framework that provides data persistence in your app. It may initially seem complicated, but understanding how it works can make it clearer. In this article, we will explore the basic steps of working with CoreData in Swift.
What is CoreData #
CoreData is maybe one of the basic framework that you need in order to get data persistance in your app.
The implementation could seem very complicated but if you understand how it works maybe it could be a little bit more clear. For this project we need different type of swift file, but we will see this and other stuff don’t worry. Let’s start
Use Core Data to save your application’s permanent data for offline use, to cache temporary data, and to add undo functionality to your app on a single device. To sync data across multiple devices in a single iCloud account, Core Data automatically mirrors your schema to a CloudKit container. Through Core Data’s Data Model editor, you define your data’s types and relationships, and generate respective class definitions. Core Data can then manage object instances at runtime to provide the following features.
Remember, import the library ! #
Open a new swift file (not swiftUI be careful), you can name it as you want. I called main Persistance As usual the first step when we use a certain framework is import the library.
import CoreData
The Controller #
In order to work with our stored data we need a controller that work as a bridge between CoreData and our personal data structure. So in the file that you have created:
import Foundation
import CoreData

struct PersistenceController {
    static let shared = PersistenceController()

    let container: NSPersistentContainer
    init() {
        container = NSPersistentContainer(name: "Accounts")

        container.loadPersistentStores { (storeDescription, error) in
            if let error = error as NSError? {
                fatalError("Container load failed: \(error)")
            }
        }
    }
}
Let’s see what is this “Controller”
- We have creaated a struct called PersistanceController, inside we define a constant that is an object of type PersistenceController()
- Then we define the container (our box that will contain our database) and we initialize it defining the constant container with the Container Object
- Then there are some control error
The DataModel file #
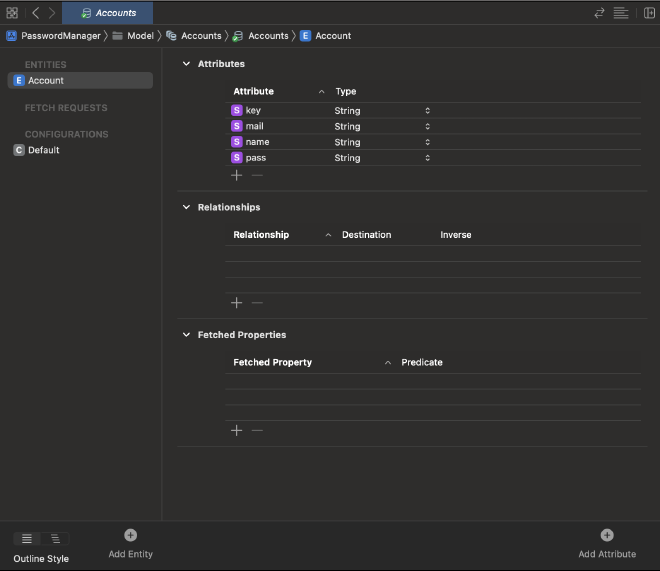
The Data Model file defines the structure of the database, including how data will be stored. In this file, you define entities (representing real-world objects) and their attributes.
Create a new Data Model file in your project and declare entities with attributes. For example, an entity called “Account” with attributes such as “Account_Name,” “Mail,” and “Password.”
Refer to the following diagram for an example of the Data Model structure:
The entity account has as attributes Account_Name, mail, password for example
So imagine that an user could have more than one account, how these will be stored ?
| Account_Name | Password | |
|---|---|---|
| Apple | mail@domain.com | Secret |
| mail@domain.com | Secret | |
| McDonald’s | mail@domain.com | Secret |
| Microsoft | mail@domain.com | Secret |
So it works like a numbers file with rows and column
Now create a new DataModel file in your project, declare the entities and add attributes like this:
Conncect the database with the View #
To connect the database structure defined in the Data Model file to the view, we need to make a few modifications in the main file:
import SwiftUI

@main
struct PasswordManagerApp: App {
    let persistenceController = PersistenceController.shared
    var body: some Scene {
        WindowGroup {
            MainView().environment(\.managedObjectContext,
                        persistenceController.container.viewContext)
        }
    }
}
In the code above, we declare the persistenceController and connect it to the view using the .environment modifier.
## Import the database into SwiftUI file
Suppose we want to display the entities in a list. We need a view connected to the database that can fetch and display the items. Consider the following code:
import SwiftUI

struct ListView: View {


    @Environment(\.managedObjectContext) private var viewContext

    @FetchRequest(entity: Account.entity(), sortDescriptors: [])

    var accounts: FetchedResults<Account>

    @State var showDetails = false


    var body: some View {
        NavigationView{
            List {
                ForEach(accounts) { account in
                    NavigationLink {
                        Text(account.name!)

                    } label: {
                        Text(account.name!)
                        }

                }.onDelete(perform: deleteProducts)
            }.navigationTitle("Order List")

        }
    }
    }
So as you can see in the first lines of code there are some important statement:
1 @Environment(\.managedObjectContext) private var viewContext
2 @FetchRequest(entity: Account.entity(), sortDescriptors: [])
3 var accounts: FetchedResults<Account>
The @Environment property wrapper automatically updates any parts of the view that depend on the managed object context.
The @FetchRequest property wrapper declares a FetchedResults property, providing a collection of CoreData managed objects to the SwiftUI view.
The ListView view displays the fetched accounts in a list, and the deleteAccounts function allows deleting items.
Display the entities #
So now that we have all the object linked we can display our entities into a visual list:
var body: some View {
        NavigationView{
            List {
                ForEach(accounts) { account in
                    NavigationLink {
                        Text(account.name!)

                    } label: {
                        Text(account.name!)
                        }

                }.onDelete(perform: deleteProducts)
            }.navigationTitle("Order List")

        }
    }
In this case we have into the list some other stuff like a navigation view ecc… But the logic is the same.
Work with the database #
To add and delete data from the database, we need some helper functions:
private func addProduct() {

            withAnimation {
                let account = Account(context: viewContext)
                account.name = name
                account.mail = quantity
                account.pass = pass
                saveContext()
            }
        }

        private func saveContext() {
            do {
                try viewContext.save()
            } catch {
                let error = error as NSError
                fatalError("An error occured: \(error)")
            }
        }


 private func deleteProducts(offsets: IndexSet) {
        withAnimation {
            offsets.map { accounts[$0] }.forEach(viewContext.delete)
                saveContext()
            }
    }
Conclusion #
This article has provided a basic introduction to working with CoreData in Swift. While we covered the essential steps for a single entity, CoreData offers more advanced features and entity relationships to explore. Remember, the best way to learn is to try, make mistakes, fix them, and iterate.
Summary #
Below is a summary of the important code snippets and files discussed:
Persistence file #
import Foundation

import CoreData

struct PersistenceController {
    static let shared = PersistenceController()

    let container: NSPersistentContainer
    init() {
        container = NSPersistentContainer(name: "Accounts")

        container.loadPersistentStores { (storeDescription, error) in
            if let error = error as NSError? {
                fatalError("Container load failed: \(error)")
            }
        }
    }
}
DataModel file #
Your_Project_NameApp #
import SwiftUI

@main
struct PasswordManagerApp: App {
    let persistenceController = PersistenceController.shared
    var body: some Scene {
        WindowGroup {
            MainView() .environment(\.managedObjectContext,
                                                  persistenceController.container.viewContext)
        }
    }
}
The view that display all the item #
//
//  ListView.swift
//  PasswordManager
//
//  Created by Matteo Altobello on 13/12/22.
//

import SwiftUI
import CryptoKit

struct ListView: View {


    @Environment(\.managedObjectContext) private var viewContext

    @FetchRequest(entity: Account.entity(), sortDescriptors: [])
    var accounts: FetchedResults<Account>
    @State var showDetails = false


    var body: some View {
        NavigationView{
            List {
                ForEach(accounts) { account in
                    NavigationLink {
                        Text(account.name!)

                    } label: {
                        Text(account.name!)
                        }

                }.onDelete(perform: deleteProducts)
            }.navigationTitle("Order List")

        }
    }

    private func saveContext() {
        do {
            try viewContext.save()
        } catch {
            let error = error as NSError
            fatalError("An error occured: \(error)")
        }
    }


    private func deleteProducts(offsets: IndexSet) {
        withAnimation {
            offsets.map { accounts[$0] }.forEach(viewContext.delete)
                saveContext()
            }
    }


}

struct ListView_Previews: PreviewProvider {
    static var previews: some View {
        ListView()
    }
}